 bmclen
- Posts : 11
Join date : 2021-05-08
 Scroll bar - How to Configure!
Thu May 13, 2021 4:35 am
I recognize there's a LOT of text here, but it's all informational and instructive. So, please go slowly as you work through these steps.
The short answer is in three parts:
[1] - Enable the scrollbar functionality on/in your Note
[2] - Configure the Default Layout (in the Skin Designer) to use scrollbars
[3] - Add a Vertical Strip from the Skin Designer [(+) Note] menu button and configure it
Details below! Enjoy! Please reply if you find another way!
Cheers!
CURRENT NOTE
=====================
Right-click the title of the current note to display a drop-down menu
Make sure the scrollbar menu item shows the Scrollbar icon with a backslash
If not, click the icon once to change it
You can click "Set skin..." on an open Note to see what skin name is in use by that note
Right-click the Stickies app in your task bar and select "Settings..."
SETTINGS - Things I like to use
=====================
Desktop
Double-clicking a note title bar [rolls up the note]
(+) New Notes
New text notes
Mark the [X] Scrollbar checkbox <=Helpful later, but not required
Appearance
(o) Show a shadow under notes and stacks
START SKIN MAKER (Designer)
=====================
On the main page, at the bottom, Leave [ ] Scrollbar un-checked!
Edit the skin of an existing Note!
Right-click an open Note to display a dropdown menu and read the Note's skin name
File > Open ...
Select the desired .INI file
In the "Skin Preview" section, click "[X] Element"
We'll use "Title/Text/Scroll Areas" later
At the lower-right corner of the "Skin Preview", click the first [Zoom] button
This will display a magnified view of the Note, which is VERY useful with aligning objects
[A] - Setup
Double-click the "Default Layout" option in the object tree
Near the bottom, find "Scrollbars" and click to mark "[X] Enable Scrollbar"
The "Range" determines where the scrollbar is allowed to move and its dimensions
LEFT = The distance from RIGHT side of Note frame
TOP = The distance from the TOP of the Note frame; higher values make the range drop vertically!
BOTM = The distance from the BOTTOM of the Note frame; higher values make the range drop vertically!
WIDTH = The width of the "channel" where the scrollbar will reside and move - a loose association!
This "channel" creates an "edge" to both sides of the scrollbar
Make sure all drop-down selectors show "sides"
Set initial values here; you'll need to adjust them in later steps due to the design of the skin
LEFT = -10
TOP = 25
BOTM = -1
WIDTH = 10
[X] No scrollbar when height is [less than] 30
This will need adjustment depending on how much text you think you'll contribute to the Note
The TOP and BOTTOM values determine the movement range of the scroll bar, and will need tiny adjustments
The TOP value should allow scroll bar to just touch the bottom of the Note's upper frame
The BOTTOM value should allow scroll bar to just touch the top of the bottom of the Note's frame
This is viewable from the Zoom'd image in the Skin Maker, as identified in the START SKIN MAKER instructions above
Click [OK]
- Creating the Scrollbar
At the top of the "Stickies Skin Designer" window
Click the [(+) New ] button and select "Vertical strip" (a new dialog box appears)
Change the name to "scrollbar" - this is for later reference when editing and can be any word or phrase
Select (o) Solid and keep the default black color; you can change it later to match the skin color scheme
The Alpha blend value affects the opacity... sometimes. The max value of 255 is 100% opaque (solid color)
Set the WIDTH to 10 to start; edit to match width seen in the LAYOUT later; Height does NOT matter.
You probably want to allow for 1px right-edge margin so the scroll bar stays within the RIGHT edge of Note.
This is all adjustable later.
[X] Draw only when [Scrollbar required] is (o) True
RANGE
------
LEFT: 1 [TL scrollbar] <= Change the dropdown FROM "sides" to these values
TOP: 0 [TL scrollbar]
BOTTOM: 0 [BR scrollbar]
These three settings become a "trial-n-error" effort, even when viewing the [Zoom]'d image
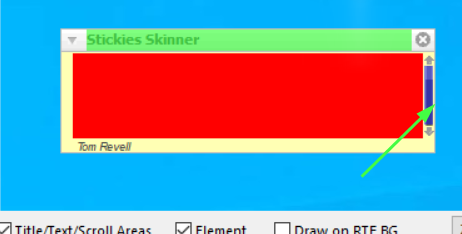
The "1 0 0" may become "-2 19 -11" because the Note canvas, as depicted in the Zoom'd image, is NOT 100% accurate
Refer to the RED rectangle, NOT the green canvas!
For Note frames that are very narrow, you'll probably want to make your scroll bar wider than
the right edge of the Note for easy access. The mouse-pointer has difficulty with a narrow scrollbar.
Note frames that use a gradient edge can be more difficult to size. Making a good color selection is important here.
If the scroll bar moves BEYOND the top of bottom of where you'd like it to end,
click the [X] Title/Text/Scroll Areas under the Skin Preview window for a better view of the scroll "track"
The top [Zoom] button will help with your positioning and accuracy of settings
Click [OK]
[C] - RETURN TO THE SKIN DESIGNER's MAIN WINDOW
Click File > Save
Click File > Export to .ssk
ReSelect your original note.
Right-click and select "Set skin..."
The skin you changed should appear.
Click the [Set Skin] button
YOU'RE DONE!!!
OBSERVATIONS:
For Notes with a small amount of content, vertically shrink the Note window so the scrollbar will appear.
Getting used to increasing and decreasing negative values for the desired affect is a learning experience.
Your currently active Note can still be used to view and check for other issues while the skin is being edited.
The Note does NOT update, of course, until you save and load the new skin.
ONCE THE SCROLL BAR IS IN PLACE, YOU MUST DRAG THE NOTE FROM THE LEFT EDGE OF THE SCROLL BAR;
NOT THE RIGHT EDIT OF THE NOTE! IN SOME CASES, YOU'LL NEED TO CLICK-n-DRAG ONE OF THE UPPER
CORNERS OF THE NOTE TO CHANGE THE NOTE'S SIZE. SOME NOTE SKINS JUST OPERATE THIS WAY.
SOME SKINS MAY SHOW UP and DOWN ARROWHEADS FOR THE SCROLL BAR.
THESE ARE BITMAP IMAGES AND NOT PART OF THE SCROLLBAR OR VERTICAL STRIP LOGIC.
YOU WOULD HAVE TO ADD THEM LIKE ANY OTHER BITMAP OBJECT TO YOUR SKIN.
You will need to adjust Range: to ensure the scrollbar reaches the top and bottom of the right side of the Note.
Click the [Zoom] button to assist you with better alignment accuracy.
If LEFT is too far to the left (large negative value: -12), you have to grab the right edge
where you'd EXPECT to grab the scroll bar! It will move correctly, but you can't grab the actual bar!
BOTTOM / BR scrollbar should be set to meet the bottom of the Note canvas; e.g. -11
TOP Higher values SHRINK the size of the scroll bar; adjust as desired
WIDTH Used to adjust 1px clearance on right edge of Note Canvas, in conjunction w/LEFT
A ONE PIXEL CHANGE CAN MAKE A BIG DIFFERENCE IN THE APPEARANCE AND ALIGNMENT OF THE NOTE OBJECTS!!!!
TYPICALLY, the scrollbar "track" and the scrollbar are the same size!
WHEN A ROLLED UP NOTE CHOPS OFF THE BOTTOM PART OF THE IMAGE, CORRECT IT THIS WAY:
Default Layout > Rolled Height (examine the "H strip" (title) object for correct height!)
The short answer is in three parts:
[1] - Enable the scrollbar functionality on/in your Note
[2] - Configure the Default Layout (in the Skin Designer) to use scrollbars
[3] - Add a Vertical Strip from the Skin Designer [(+) Note] menu button and configure it
Details below! Enjoy! Please reply if you find another way!
Cheers!
CURRENT NOTE
=====================
Right-click the title of the current note to display a drop-down menu
Make sure the scrollbar menu item shows the Scrollbar icon with a backslash
If not, click the icon once to change it
You can click "Set skin..." on an open Note to see what skin name is in use by that note
Right-click the Stickies app in your task bar and select "Settings..."
SETTINGS - Things I like to use
=====================
Desktop
Double-clicking a note title bar [rolls up the note]
(+) New Notes
New text notes
Mark the [X] Scrollbar checkbox <=Helpful later, but not required
Appearance
(o) Show a shadow under notes and stacks
START SKIN MAKER (Designer)
=====================
On the main page, at the bottom, Leave [ ] Scrollbar un-checked!
Edit the skin of an existing Note!
Right-click an open Note to display a dropdown menu and read the Note's skin name
File > Open ...
Select the desired .INI file
In the "Skin Preview" section, click "[X] Element"
We'll use "Title/Text/Scroll Areas" later
At the lower-right corner of the "Skin Preview", click the first [Zoom] button
This will display a magnified view of the Note, which is VERY useful with aligning objects
[A] - Setup
Double-click the "Default Layout" option in the object tree
Near the bottom, find "Scrollbars" and click to mark "[X] Enable Scrollbar"
The "Range" determines where the scrollbar is allowed to move and its dimensions
LEFT = The distance from RIGHT side of Note frame
TOP = The distance from the TOP of the Note frame; higher values make the range drop vertically!
BOTM = The distance from the BOTTOM of the Note frame; higher values make the range drop vertically!
WIDTH = The width of the "channel" where the scrollbar will reside and move - a loose association!
This "channel" creates an "edge" to both sides of the scrollbar
Make sure all drop-down selectors show "sides"
Set initial values here; you'll need to adjust them in later steps due to the design of the skin
LEFT = -10
TOP = 25
BOTM = -1
WIDTH = 10
[X] No scrollbar when height is [less than] 30
This will need adjustment depending on how much text you think you'll contribute to the Note
The TOP and BOTTOM values determine the movement range of the scroll bar, and will need tiny adjustments
The TOP value should allow scroll bar to just touch the bottom of the Note's upper frame
The BOTTOM value should allow scroll bar to just touch the top of the bottom of the Note's frame
This is viewable from the Zoom'd image in the Skin Maker, as identified in the START SKIN MAKER instructions above
Click [OK]
- Creating the Scrollbar
At the top of the "Stickies Skin Designer" window
Click the [(+) New ] button and select "Vertical strip" (a new dialog box appears)
Change the name to "scrollbar" - this is for later reference when editing and can be any word or phrase
Select (o) Solid and keep the default black color; you can change it later to match the skin color scheme
The Alpha blend value affects the opacity... sometimes. The max value of 255 is 100% opaque (solid color)
Set the WIDTH to 10 to start; edit to match width seen in the LAYOUT later; Height does NOT matter.
You probably want to allow for 1px right-edge margin so the scroll bar stays within the RIGHT edge of Note.
This is all adjustable later.
[X] Draw only when [Scrollbar required] is (o) True
RANGE
------
LEFT: 1 [TL scrollbar] <= Change the dropdown FROM "sides" to these values
TOP: 0 [TL scrollbar]
BOTTOM: 0 [BR scrollbar]
These three settings become a "trial-n-error" effort, even when viewing the [Zoom]'d image
The "1 0 0" may become "-2 19 -11" because the Note canvas, as depicted in the Zoom'd image, is NOT 100% accurate
Refer to the RED rectangle, NOT the green canvas!
For Note frames that are very narrow, you'll probably want to make your scroll bar wider than
the right edge of the Note for easy access. The mouse-pointer has difficulty with a narrow scrollbar.
Note frames that use a gradient edge can be more difficult to size. Making a good color selection is important here.
If the scroll bar moves BEYOND the top of bottom of where you'd like it to end,
click the [X] Title/Text/Scroll Areas under the Skin Preview window for a better view of the scroll "track"
The top [Zoom] button will help with your positioning and accuracy of settings
Click [OK]
[C] - RETURN TO THE SKIN DESIGNER's MAIN WINDOW
Click File > Save
Click File > Export to .ssk
ReSelect your original note.
Right-click and select "Set skin..."
The skin you changed should appear.
Click the [Set Skin] button
YOU'RE DONE!!!
OBSERVATIONS:
For Notes with a small amount of content, vertically shrink the Note window so the scrollbar will appear.
Getting used to increasing and decreasing negative values for the desired affect is a learning experience.
Your currently active Note can still be used to view and check for other issues while the skin is being edited.
The Note does NOT update, of course, until you save and load the new skin.
ONCE THE SCROLL BAR IS IN PLACE, YOU MUST DRAG THE NOTE FROM THE LEFT EDGE OF THE SCROLL BAR;
NOT THE RIGHT EDIT OF THE NOTE! IN SOME CASES, YOU'LL NEED TO CLICK-n-DRAG ONE OF THE UPPER
CORNERS OF THE NOTE TO CHANGE THE NOTE'S SIZE. SOME NOTE SKINS JUST OPERATE THIS WAY.
SOME SKINS MAY SHOW UP and DOWN ARROWHEADS FOR THE SCROLL BAR.
THESE ARE BITMAP IMAGES AND NOT PART OF THE SCROLLBAR OR VERTICAL STRIP LOGIC.
YOU WOULD HAVE TO ADD THEM LIKE ANY OTHER BITMAP OBJECT TO YOUR SKIN.
You will need to adjust Range: to ensure the scrollbar reaches the top and bottom of the right side of the Note.
Click the [Zoom] button to assist you with better alignment accuracy.
If LEFT is too far to the left (large negative value: -12), you have to grab the right edge
where you'd EXPECT to grab the scroll bar! It will move correctly, but you can't grab the actual bar!
BOTTOM / BR scrollbar should be set to meet the bottom of the Note canvas; e.g. -11
TOP Higher values SHRINK the size of the scroll bar; adjust as desired
WIDTH Used to adjust 1px clearance on right edge of Note Canvas, in conjunction w/LEFT
A ONE PIXEL CHANGE CAN MAKE A BIG DIFFERENCE IN THE APPEARANCE AND ALIGNMENT OF THE NOTE OBJECTS!!!!
TYPICALLY, the scrollbar "track" and the scrollbar are the same size!
WHEN A ROLLED UP NOTE CHOPS OFF THE BOTTOM PART OF THE IMAGE, CORRECT IT THIS WAY:
Default Layout > Rolled Height (examine the "H strip" (title) object for correct height!)
- GuestGuest
Re: Scroll bar - How to Configure!
Sat May 15, 2021 2:55 pm
----------------------
once the scroll bar is in place, you must drag the note from the left edge of the scroll bar;
not the right edit of the note! in some cases, you'll need to click-n-drag one of the upper
corners of the note to change the note's size. some note skins just operate this way.
----------------------
I don't know if this will be a solution to the dragging problem you mentioned but Cynthia or Tom Revell once pointed out to leave a gap to the right of the scrollbar area so dragging is posible on the right border .
Nice instructions , maybe you can add some images ? It would be easer to follow and makes it visually easier to read through . Hope it encourages more skin makers !
Greetings ,
Permissions in this forum:
You can reply to topics in this forum|
|
|